Why Integrate Aptabase with Docusaurus?
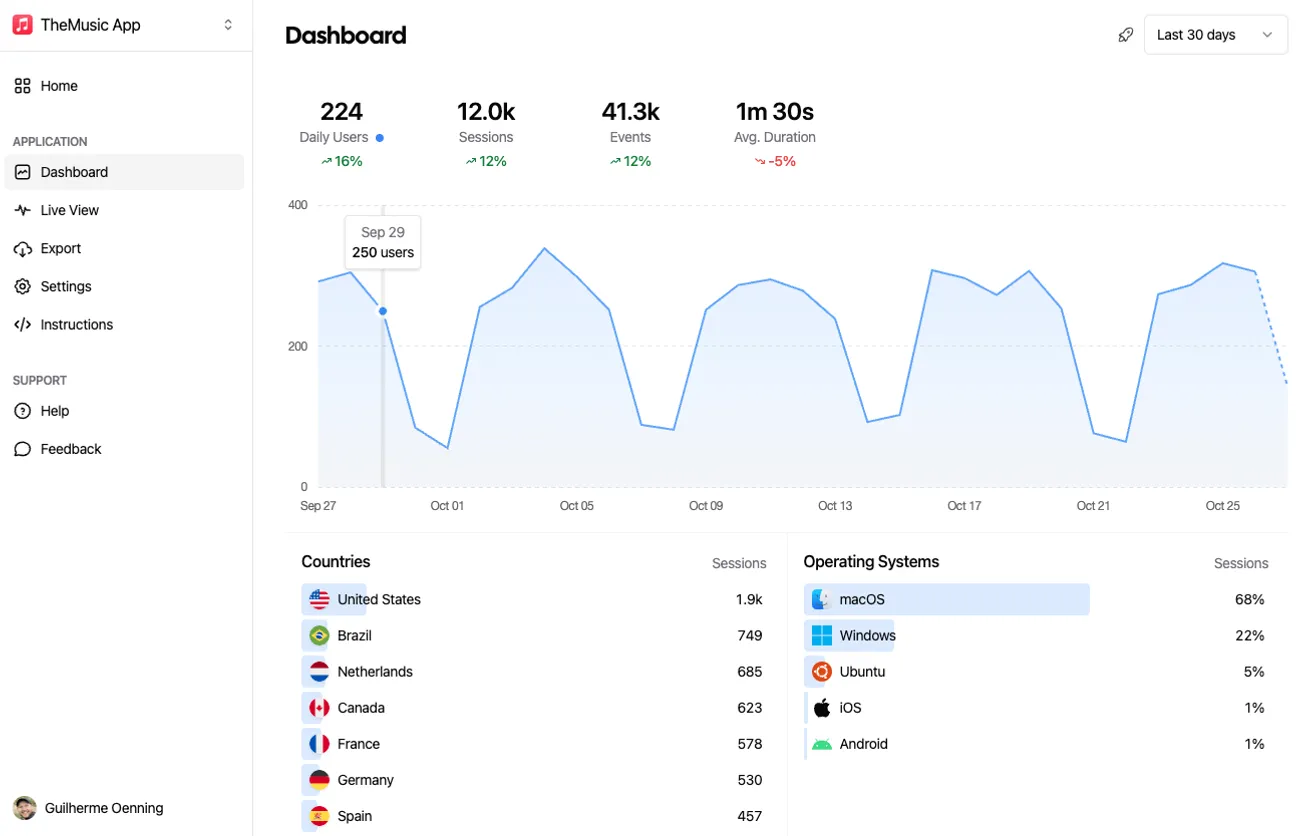
Docusaurus is a popular static site generator for documentation sites, and Aptabase offers a lightweight, privacy-first way to track user behavior. By combining them, you can gain insights into how users navigate your site and interact with features like search or feedback forms.
This post assumes you have a Docusaurus site ready, basic React knowledge and want to add Aptabase analytics.
We’ll cover:
- Configuring the Aptabase app key.
- Tracking screen views globally.
- Tracking custom events.
Let’s get started!
Configuring the Aptabase App Key
To use Aptabase, you need an app key, which authenticates your site with the Aptabase server. While you could hardcode the key directly in your code, it’s a good practice to store it in docusaurus.config.js for better organization and maintainability.
However, let’s be honest: since the Aptabase app key is used client-side, it will always be exposed in the browser, so the security benefits of avoiding hardcoding are minimal in this case. Still, using the Docusaurus configuration keeps your code cleaner and easier to manage.
Step 1: Create a .env file:
For better flexibility, you can store the Aptabase app key in an environment variable. This approach is useful for switching keys between environments (e.g., development vs. production) and aligns with good configuration practices.
- In your Docusaurus project root, create a
.envfile (or use.env.localfor local development). - Add your environment variables, preferably with a
DOCUSAURUS_prefix to avoid conflicts:
DOCUSAURUS_APTABASE_APP_KEY=your-actual-app-key
DOCUSAURUS_APTABASE_HOST=https://us.aptabase.com- 💡Ensure
.envis added to.gitignoreto prevent committing sensitive data.
Step 2: Install dotenv (Optional):
- Docusaurus uses Webpack, which automatically loads
.envfiles in modern Node.js environments. However, to ensure compatibility, you can install thedotenvpackage:
npm install --save dotenvIf you install dotenv, you don’t need to manually load it in docusaurus.config.js because Docusaurus’s build process handles it. However, if you need to load it explicitly in custom scripts, you can add require('dotenv').config() at the top of those scripts.
Step 3: Configure docusaurus.config.js
- Add the Aptabase app key to the
customFieldsobject indocusaurus.config.js. You can either hardcode it or load it from an environment variable.
// docusaurus.config.js
module.exports = {
  // Other Docusaurus configurations...
  plugins: [],
  customFields: {
    aptabaseAppKey: process.env.DOCUSAURUS_APTABASE_APP_KEY || '',
    aptabaseHost: process.env.DOCUSAURUS_APTABASE_HOST || 'https://us.aptabase.com',
  },
  // Other configurations...
};
Step 4: Create the useAptabase React Hook
- Install the @aptabase/web package:
npm install @aptabase/web- Create a custom hook to initialize Aptabase using the app key from the Docusaurus configuration. Use the
useDocusaurusContexthook to accesscustomFields.
// src/hooks/useAptabase.js
import { useEffect } from 'react';
import { init } from '@aptabase/web';
import { useDocusaurusContext } from '@docusaurus/useDocusaurusContext';

export const useAptabase = () => {
  const { siteConfig } = useDocusaurusContext();
  const { aptabaseAppKey, aptabaseHost } = siteConfig.customFields;

  useEffect(() => {
    // Only initialize on the client side
    if (typeof window !== 'undefined' && aptabaseAppKey) {
      init(aptabaseAppKey, {
        host: aptabaseHost,
        isDebug: process.env.NODE_ENV !== 'production', // Enable debug logs in development
      });
    }
  }, [aptabaseAppKey, aptabaseHost]); // Re-run if key or host changes
};
Why This Approach?
- Storing the key in
docusaurus.config.jskeeps your code tidy and centralized, making it easier to update or manage across your project. - Using environment files allows you to switch keys for different environments, though the key’s exposure in the browser means this is more about convenience than security.
- In production, set environment variables via your hosting platform (e.g., Vercel, Netlify, or CI/CD pipelines) instead of relying on a
.envfile. For example:- Vercel: Add
DOCUSAURUS_APTABASE_APP_KEYandDOCUSAURUS_APTABASE_HOSTin the Vercel dashboard under Environment Variables. - Netlify: Configure variables in the Netlify UI under Site Settings > Environment Variables.
- Vercel: Add
Project Structure Example
If you’re new to Docusaurus, here’s where the new files from this guide should live in your project:
my-docusaurus-project/
├─ docusaurus.config.js
├─ .env
├─ src/
│  ├─ hooks/
│  │  └─ useAptabase.js       # Custom hook for Aptabase
│  ├─ theme/
│  │  └─ Root.js              # Wraps all pages, sets up global tracking
│  ├─ components/
│  │  ├─ SearchBar.js         # Custom search tracking component
│  │  └─ FeedbackForm.js      # Custom feedback tracking component
│  └─ pages/
│     └─ feedback.js          # Page combining SearchBar + FeedbackForm
Tracking Screen Views Globally
To track page views across your Docusaurus site, use the Root.js component, which wraps all pages and is perfect for global analytics setup.
By combining the useAptabase hook with Docusaurus’s useLocation hook, you can log a screen_view event whenever a user navigates to a new page.
Setting Up the Root Wrapper
Create or edit src/theme/Root.js:
// src/theme/Root.js
import React, { useEffect } from 'react';
import { useAptabase } from '../hooks/useAptabase';
import { trackEvent } from '@aptabase/web';
import { useLocation } from '@docusaurus/router';

export default function Root({ children }) {
  useAptabase(); // Initialize Aptabase
  const location = useLocation();

  useEffect(() => {
    // Track page views
    trackEvent('screen_view', {
      screen: location.pathname,
    });
  }, [location]); // Re-run when location changes

  return <>{children}</>;
}
How It Works
- Initialization: The
useAptabasehook initializes Aptabase with the app key fromdocusaurus.config.js. - Page View Tracking: The
useLocationhook provides the current URL path. TheuseEffecthook triggers atrackEventcall for each navigation, logging ascreen_viewevent with the page path. - Efficiency: The
[location]dependency ensures the effect runs only when the path changes.
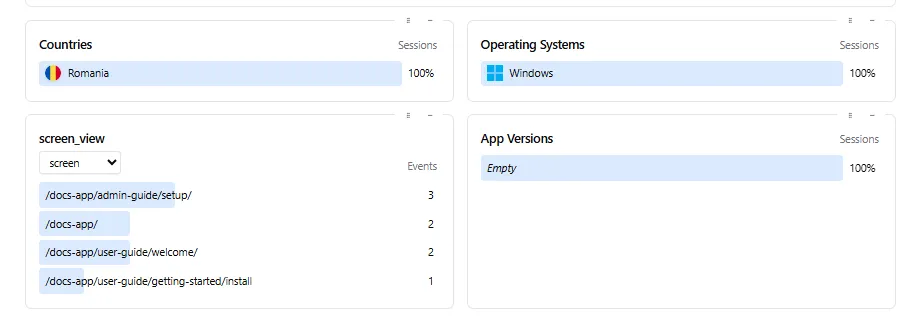
This setup provides a nice view of page navigation across your site in the Aptabase dashboard:
Tracking Custom Events
Custom events like search queries and feedback submissions offer deeper insights into user behavior. You can track these by calling trackEvent from @aptabase/web in specific components where these actions occur.
Tracking Search Events
Create a SearchBar component to track searches when users submit queries:
// src/components/SearchBar.js
import React, { useState } from 'react';
import { trackEvent } from '@aptabase/web';

export default function SearchBar() {
  const [query, setQuery] = useState('');

  const handleSearch = (e) => {
    e.preventDefault();
    if (query.trim()) {
      trackEvent('search', {
        query: query,
        page: window.location.pathname,
      });
      console.log(`Searching for: ${query}`); // Replace with actual search logic
    }
  };

  return (
    <form onSubmit={handleSearch}>
      <input
        type="text"
        value={query}
        onChange={(e) => setQuery(e.target.value)}
        placeholder="Enter search term..."
      />
      <button type="submit">Search</button>
    </form>
  );
}- What’s Happening: On form submission,
trackEventlogs asearchevent with the query, current page. - Integration: Add
<SearchBar />to your navbar, a page, or swizzle the Docusaurus search component if using Algolia.
Tracking Feedback Events
Create a FeedbackForm component to track feedback submissions:
// src/components/FeedbackForm.js
import React, { useState } from 'react';
import { trackEvent } from '@aptabase/web';

export default function FeedbackForm() {
  const [feedback, setFeedback] = useState('');
  const [rating, setRating] = useState(0);

  const handleSubmit = (e) => {
    e.preventDefault();
    if (feedback.trim() || rating > 0) {
      trackEvent('feedback', {
        rating,
        page: window.location.pathname,
      });
      // Replace with backend submission
      console.log(`Feedback submitted: ${feedback}, Rating: ${rating}`);
      setFeedback('');
      setRating(0);
    }
  };

  return (
    <form onSubmit={handleSubmit}>
      <textarea
         value={feedback}
         onChange={(e) => setFeedback(e.target.value)}
         placeholder="Enter your feedback..."
      />
      <div>
        <label>Rating (1-5):</label>
        <input
          type="number"
          min="1"
          max="5"
          value={rating}
          onChange={(e) => setRating(Number(e.target.value))}
        />
      </div>
      <button type="submit">Submit Feedback</button>
    </form>
  );
}- What’s Happening: On form submission,
trackEventlogs afeedbackevent with the rating and page. - Integration: Add
<FeedbackForm />to a dedicated page (e.g.,/feedback) or a sidebar.
Example: Combining Components in a Page
Create a page to include both components:
// src/pages/feedback.js
import React from 'react';
import Layout from '@theme/Layout';
import SearchBar from '../components/SearchBar';
import FeedbackForm from '../components/FeedbackForm';

export default function FeedbackPage() {
  return (
    <Layout title="Feedback">
      <h1>Feedback & Search</h1>
      <SearchBar />
      <FeedbackForm />
    </Layout>
  );
}
Best Practices and Tips
- Event Naming: Use consistent names (e.g.,
screen_view,search,feedback) for clarity in the dashboard. - Properties: Include relevant properties like
query,rating, orpageto contextualize events. - Privacy: Avoid sending sensitive data in event properties and ensure compliance with privacy laws.
- Performance: Prefer component-level tracking for specific events to keep
Root.jslightweight.
References
Conclusion
Integrating Aptabase with Docusaurus is a straightforward way to track user behavior on your documentation site.
If you have any questions or feedback, feel free to reach out on Twitter or join us on Discord and we’ll be happy to help!